Building an All-in-One Air Quality Monitor for About $30
I wanted a small indoor air-quality monitor that showed more than PM2.5. Temperature and humidity are useful, but I also wanted VOC and NOx indices because those are the numbers that change quickly when cooking, cleaning, ventilating, or leaving a room closed for too long.
The second requirement was integration. A standalone display is nice, but the data becomes more useful when Home Assistant can graph it over time. Commercial monitors with this combination of sensors and dashboard integration often cost much more than I wanted to spend, so I built a compact version around ESP32-C3 + SEN55 + ESPHome.
This write-up records the build as it happened: parts, wiring, ESPHome YAML, the display logic, and the debugging path for the OLED “black screen” issue. The goal is not lab-grade measurement; it is a cheap, inspectable monitor that makes indoor trends visible.
1. Hardware Selection
A. The Controller: ESP32C3-PRO Development Board
I used a generic ESP32-C3 development board from an online marketplace.
-
Chip: ESP32-C3 (RISC-V, Wi-Fi + Bluetooth).
-
Onboard: USB-C for power/flashing, BOOT/RESET buttons.
-
Key Feature: Integrated 0.96” OLED (128×64, SSD1306).
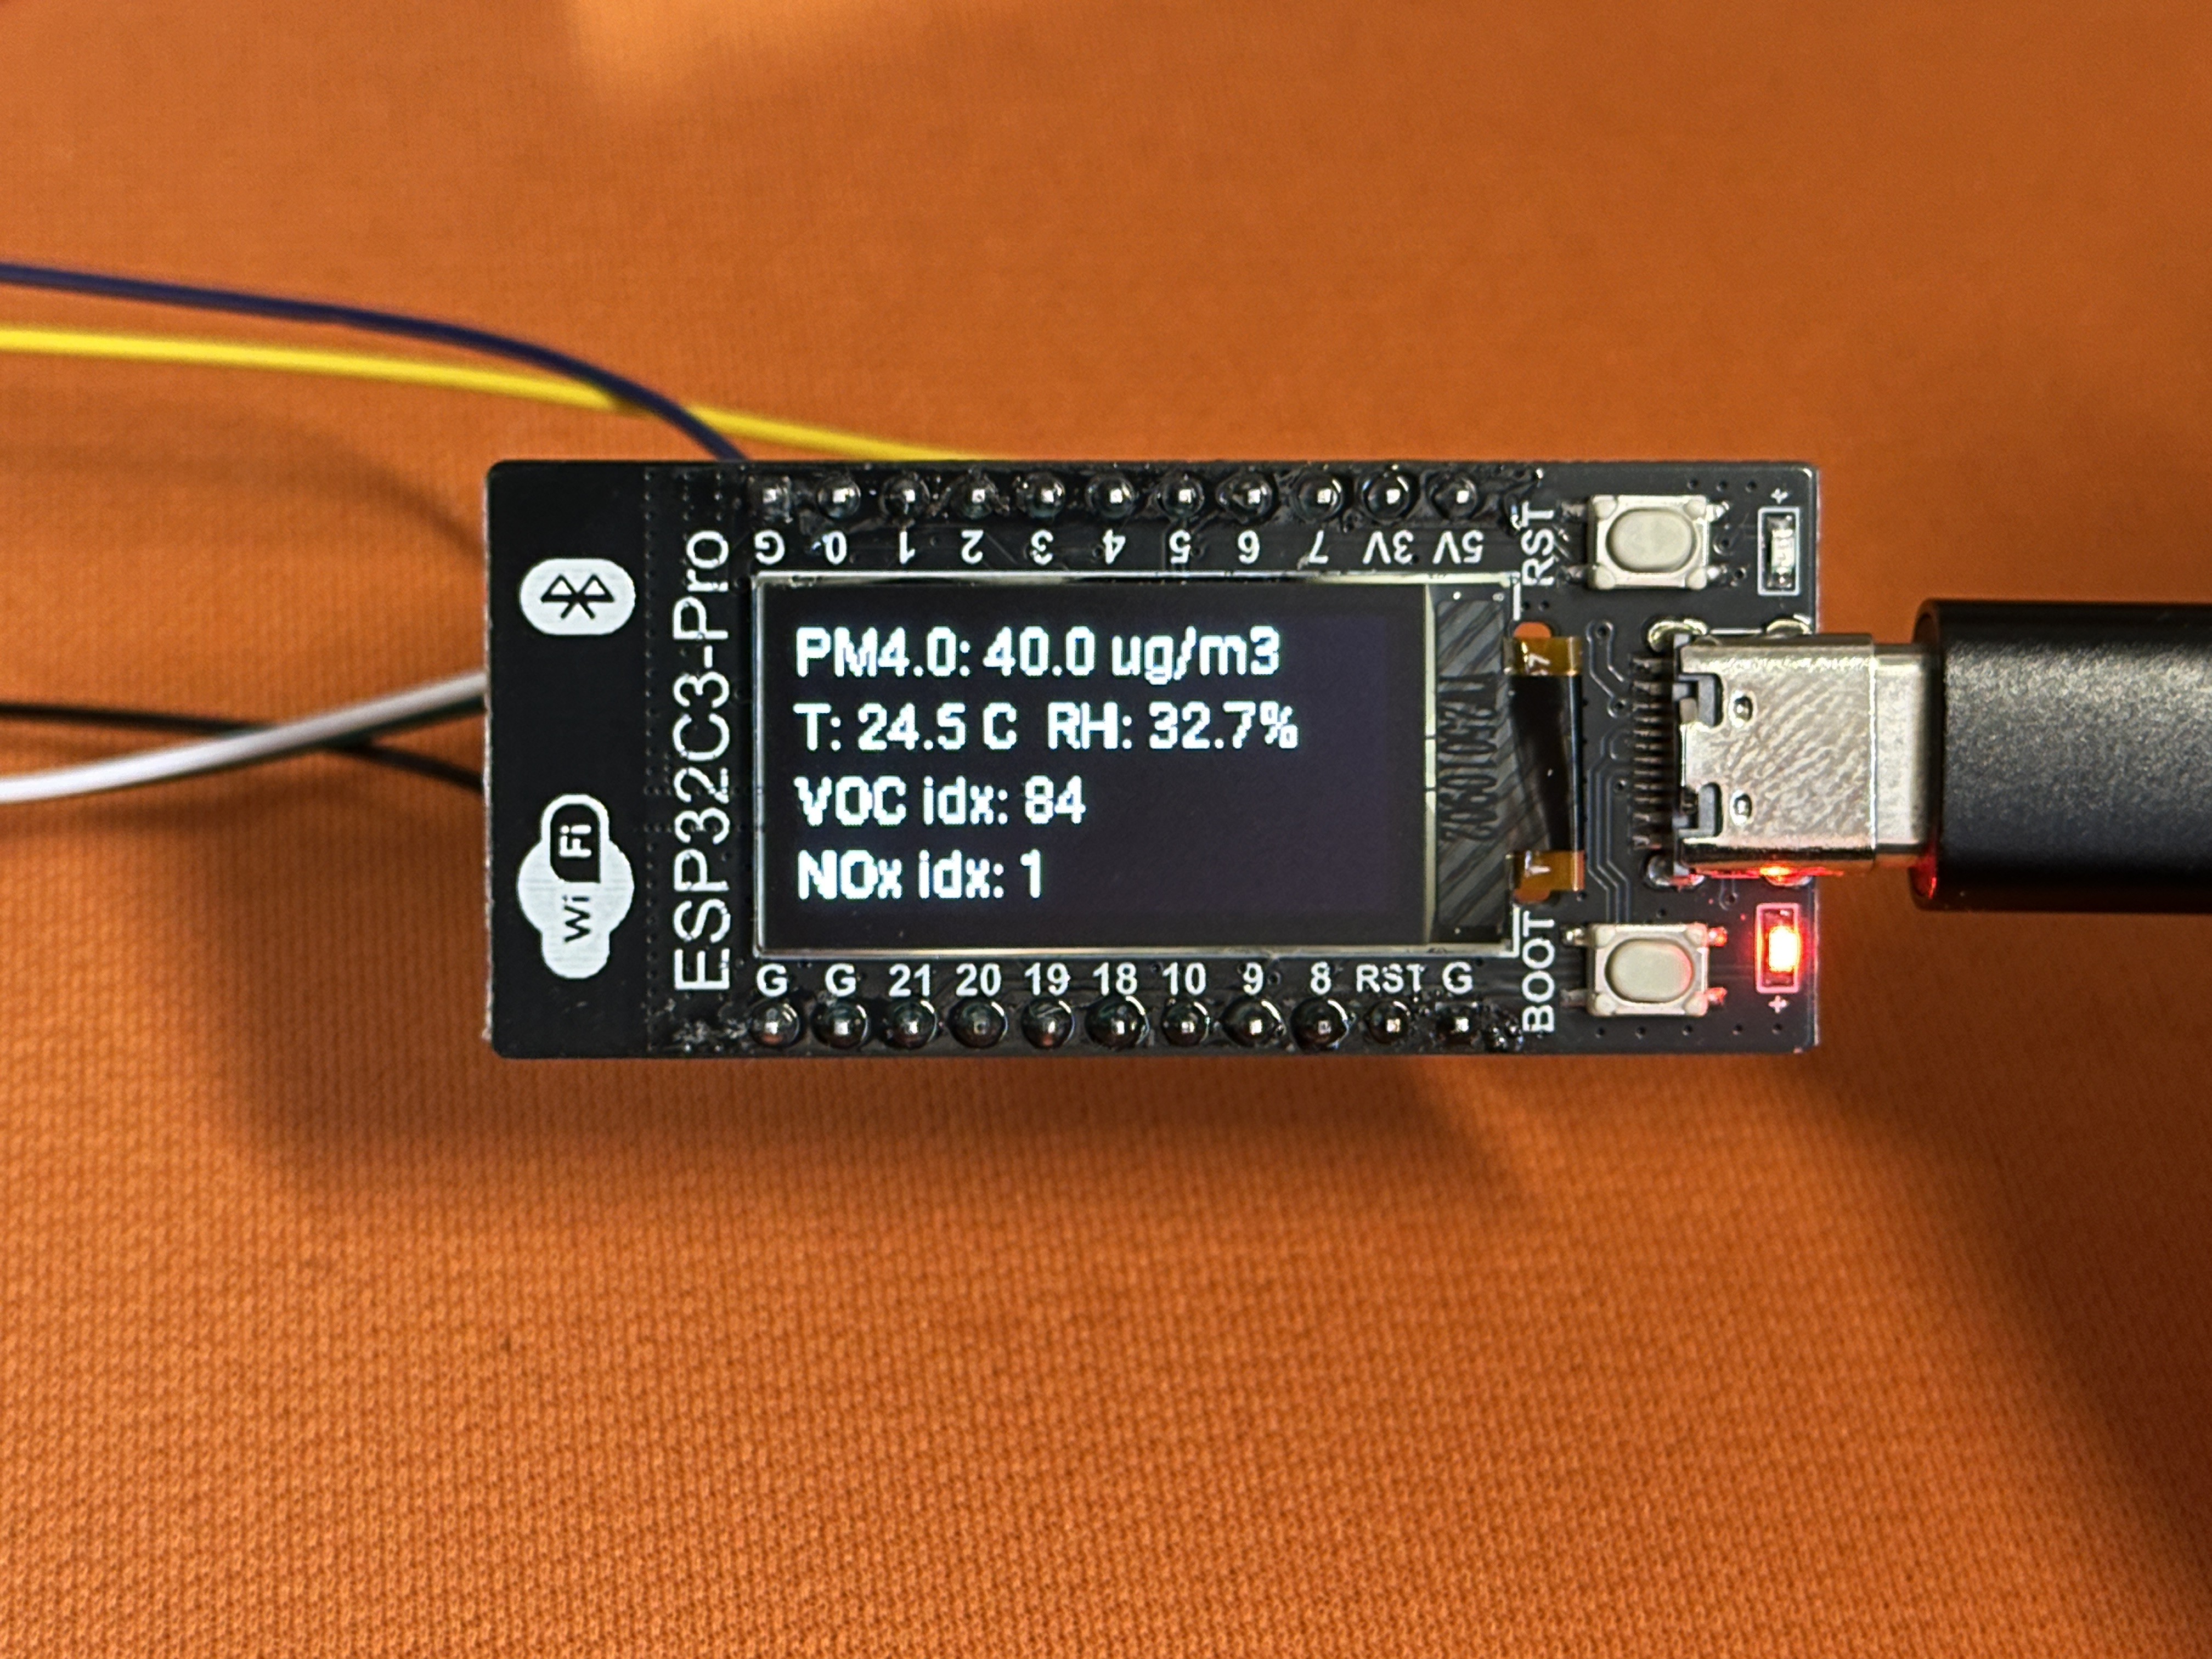
The onboard OLED is the reason this board was attractive. It removes the extra wiring normally needed for a display, while the ESP32 handles Wi-Fi, firmware, and Home Assistant communication. I only needed to attach the external sensor to the I2C bus. The board was also cheap, roughly $3 USD.
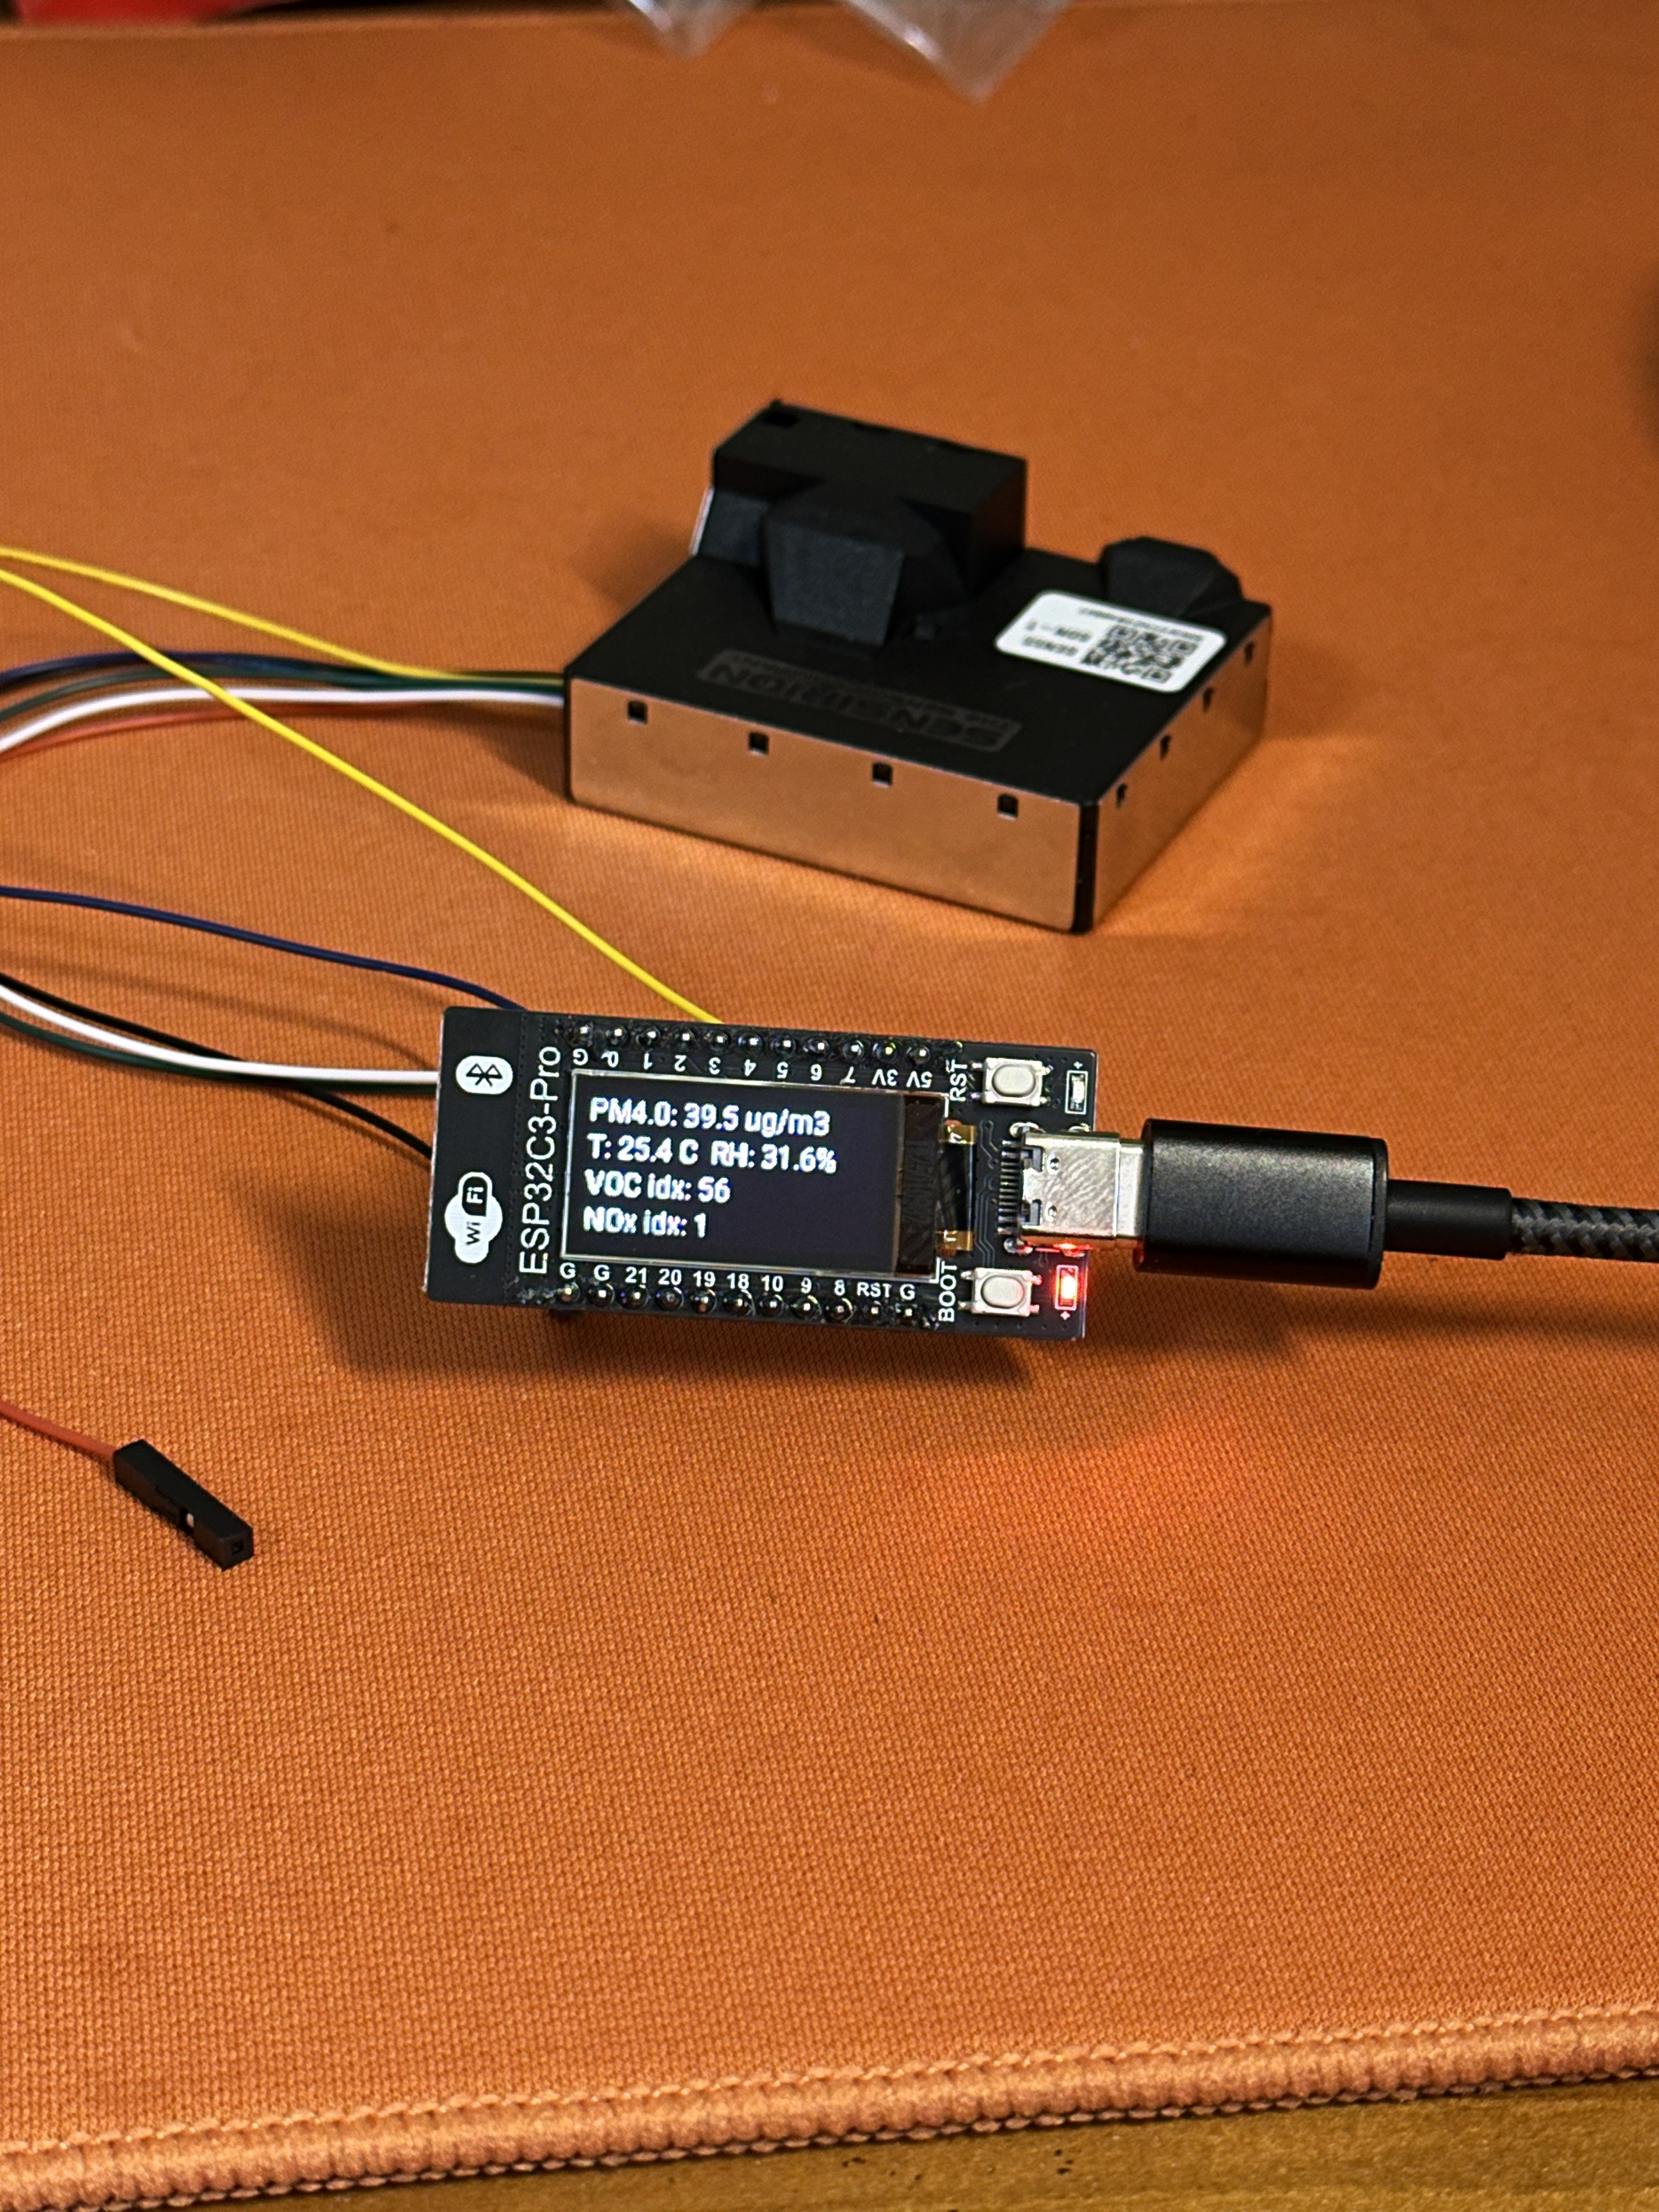
B. The Sensor: Sensirion SEN55-SDN-T
The star of the show. The SEN55 module is an industrial-grade “all-in-one” package:
-
PM1.0 / 2.5 / 4.0 / 10
-
Temperature & Relative Humidity
-
VOC Index (Volatile Organic Compounds)
-
NOx Index (Nitrogen Oxides)
Unlike simple passive sensors, the SEN55 has an integrated fan for active airflow. I bought the SDN-T version, which comes soldered to a breakout board with voltage regulation and pull-up resistors, using a GH1.25 6P interface. It costs around $28 USD and is the only expensive part of this build.
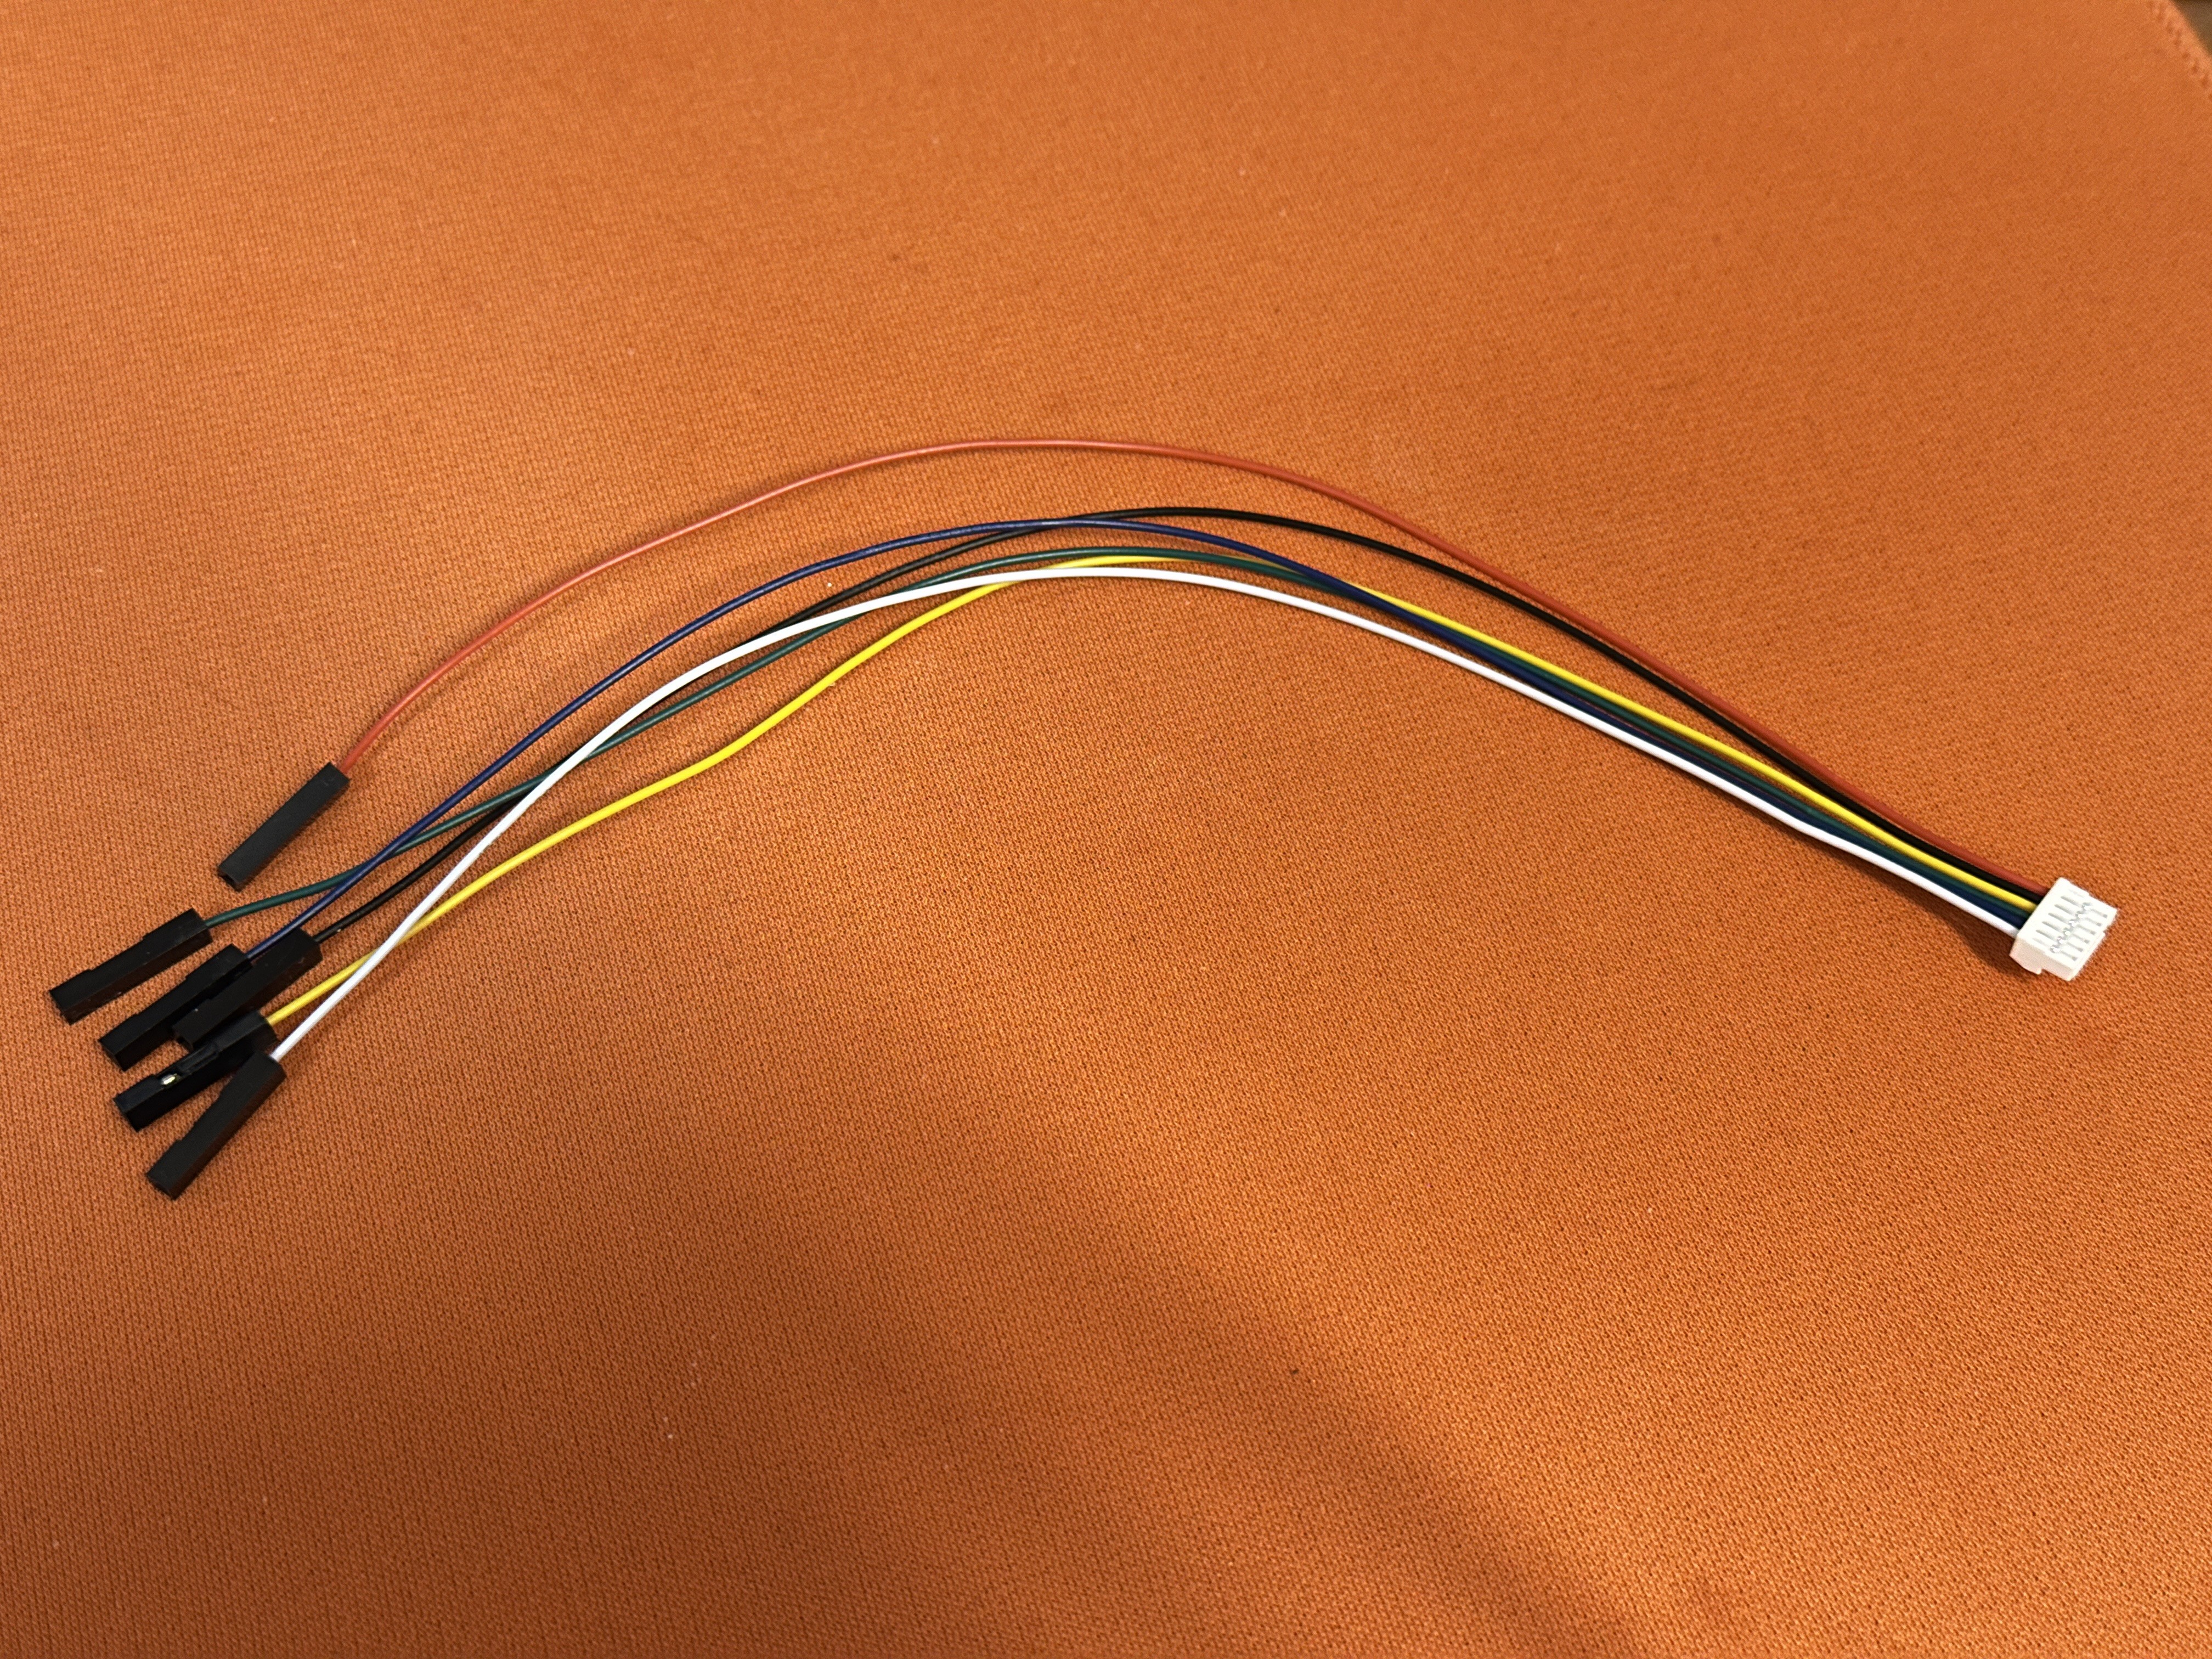
C. The Cable: GH1.25 to 2.54mm DuPont
The sensor uses a tiny GH1.25 socket, while the ESP32 uses standard 2.54mm headers. To avoid soldering or crimping (and the resulting headaches), I bought a pre-made adapter cable:
-
End A: GH1.25 6P plug (for the sensor).
-
End B: 6x DuPont female connectors (for the ESP32).
That cable turned the sensor connection into a simple “rainbow tail” instead of a soldering job.
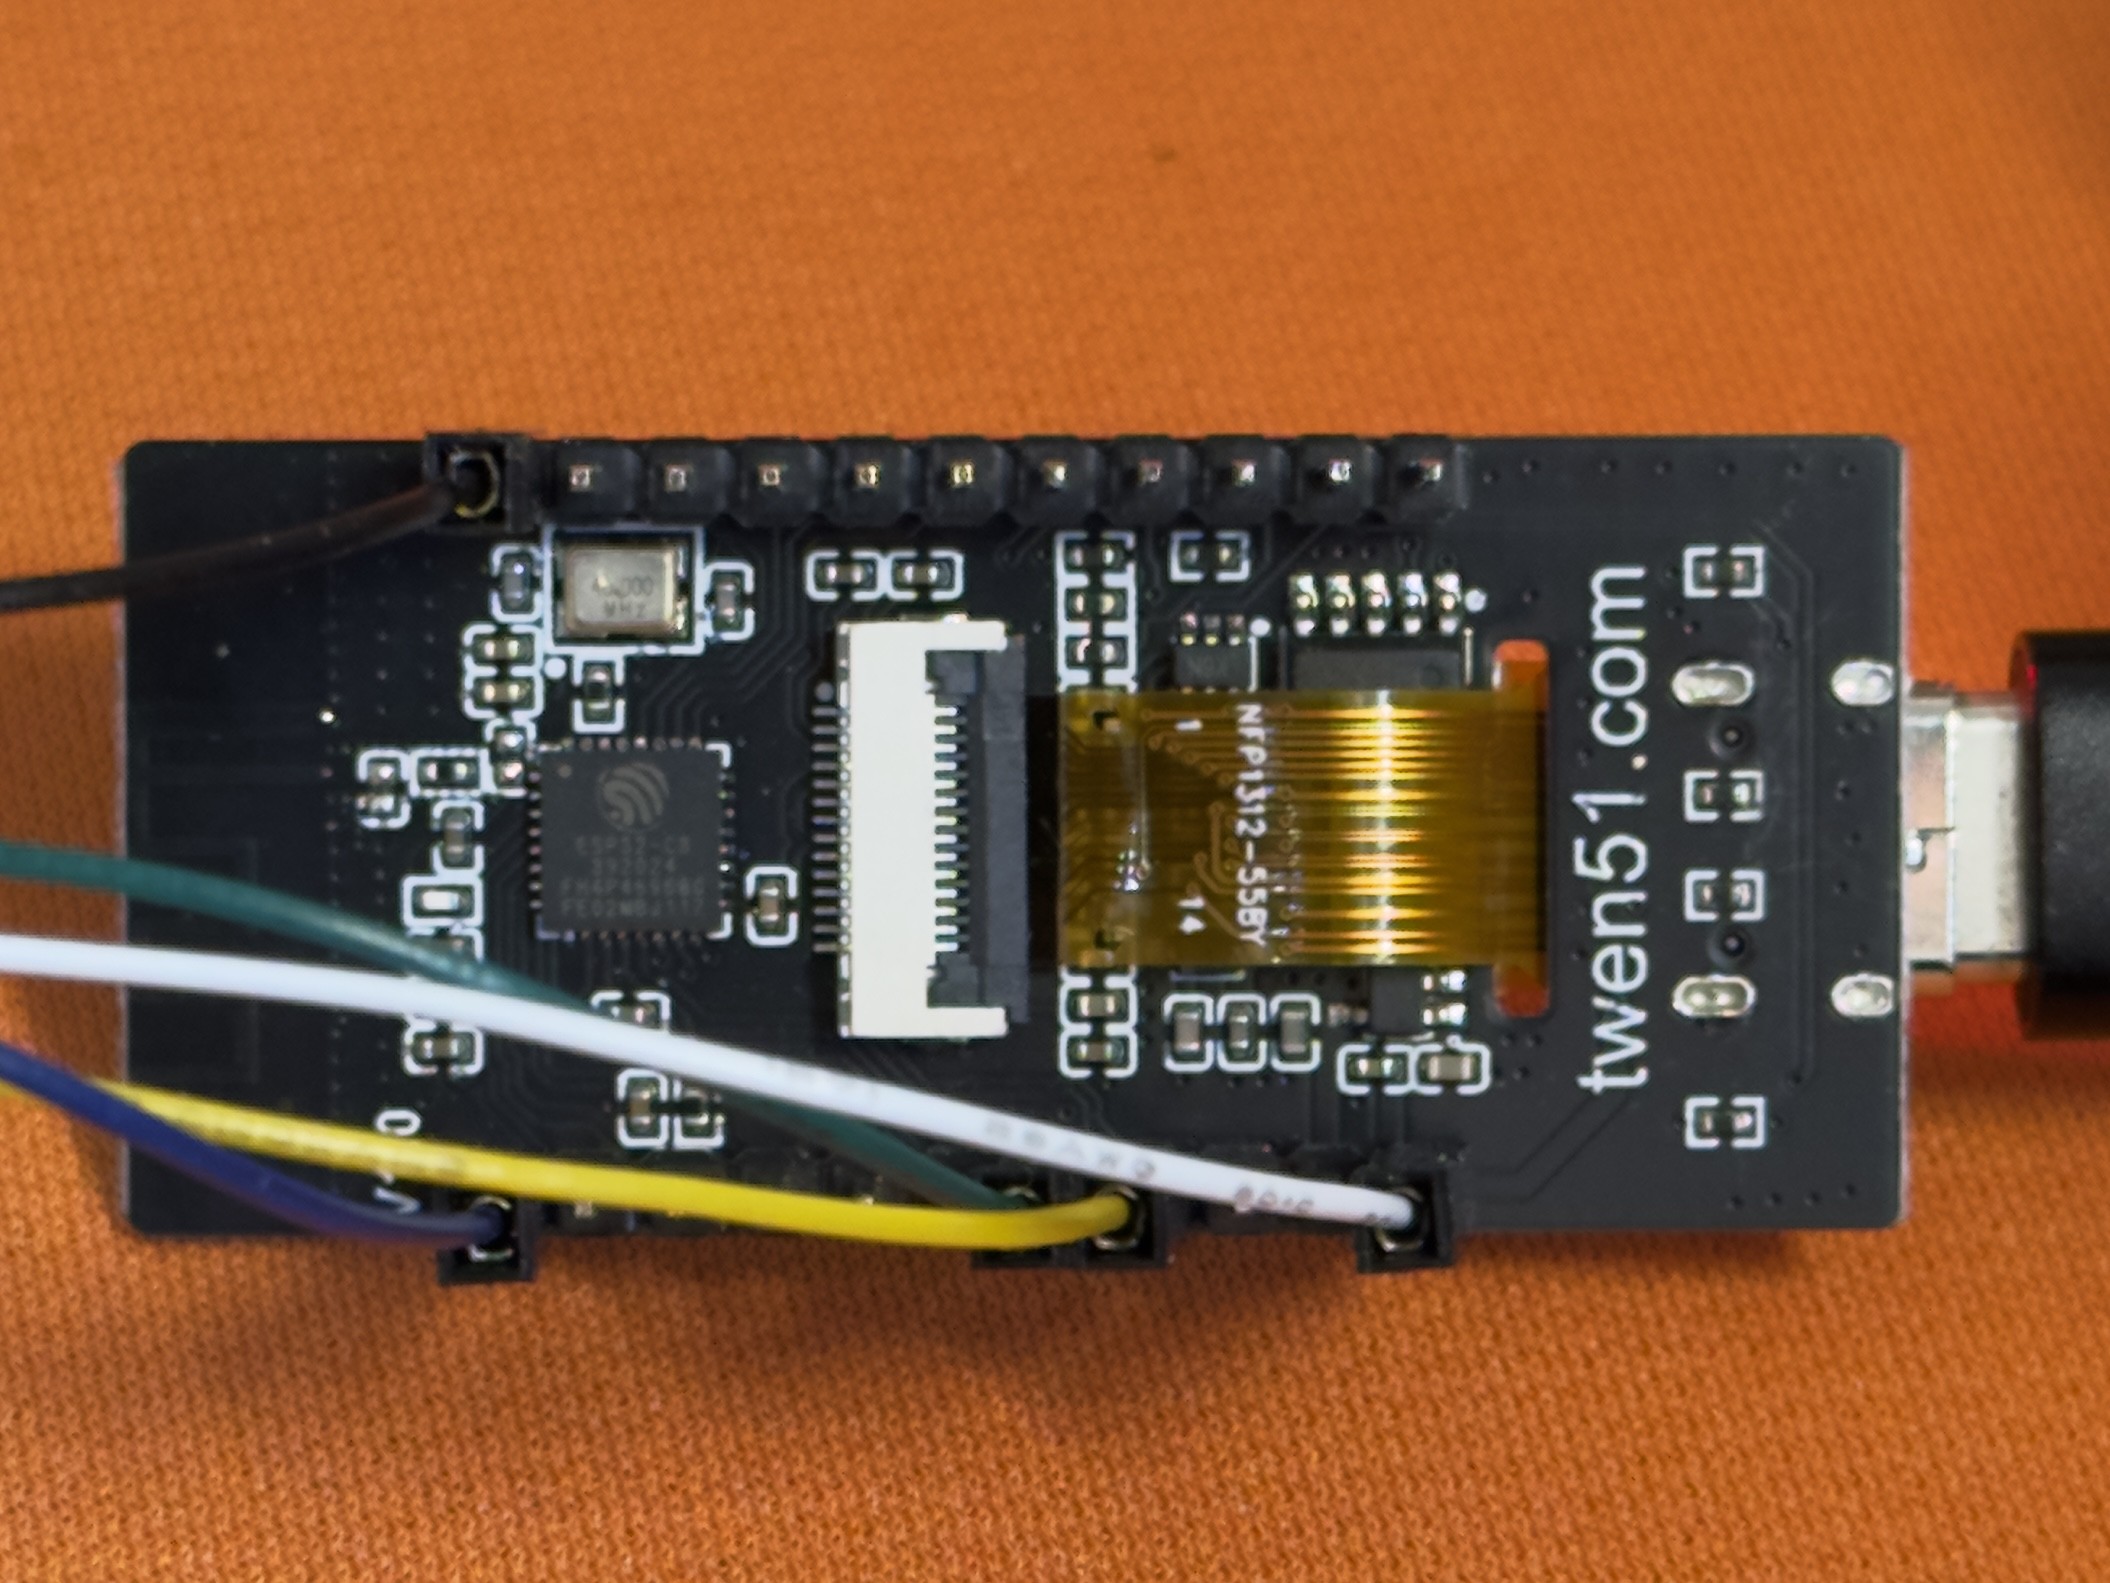
2. Wiring
The wiring is simple if you trust the SEN55 breakout-board silkscreen and do not assume the ESP32-C3 board uses the same I2C pins as every other C3 board.
| SEN55 Pin | ESP32-C3 Pin | Note |
|---|---|---|
| VCC / VIN | 5V | SEN55 needs 5V for the fan |
| GND | GND | Ground |
| SDA | GPIO 5 | I2C Data |
| SCL | GPIO 6 | I2C Clock |
| SEL / NC | N/A | Leave floating |
Note on I2C pins: this is where the build became tricky. On this specific C3-PRO board, the useful I2C bus is on GPIO 5 and 6, not the GPIO 8 and 9 pair often seen on other ESP32-C3 boards.
3. Debugging The Black OLED Screen
The first firmware flash was only half successful. Sensor data appeared in the logs, which meant the SEN55 path was alive, but the OLED screen stayed black. That made the problem narrower: power was fine, the ESP32 was booting, and at least part of the I2C setup worked, but the display was not being addressed correctly.
The debugging path was:
-
The “Generic” Trap: I initially assumed the I2C pins were GPIO 8 (SDA) and 9 (SCL), which is common for ESP32-C3. The log showed
[I2C] Bus scan... No devices found. -
Finding the Pins: After inspecting the board layout and consulting community documentation (LuatOS/WeAct styles), I discovered this specific form factor uses GPIO 5 (SDA) and GPIO 6 (SCL).
-
The Driver Mismatch: Even with the correct pins, the screen wouldn’t turn on. I tried the
SSD1306driver, then theSH1106driver. -
The Reset Pin Mystery: Some boards require a manual reset pin definition (often GPIO 7 or 10). I tried toggling these in the YAML config.
-
The Solution: It turned out to be a combination of using GPIO 5/6 for I2C and ensuring the correct SSD1306 model definition. Once I corrected the pins in the
i2csection, the screen sprang to life.
The lesson is simple: never trust default pinouts for unbranded dev boards. Check the schematic if you can, and let the I2C scan tell you what the board is actually doing.
4. Software: ESPHome YAML
I used ESPHome because it keeps the firmware path short: write YAML, flash the board, and let Home Assistant discover the device through the native API.
Prerequisites
- Install Python 3.11+.
- Install ESPHome:
pip install esphome. - Create the config file and run:
esphome run air-monitor.yaml.
The Complete Configuration
Here is the final working YAML. The display lambda rotates through the four PM readings on the first line every five seconds, while temperature, humidity, VOC, and NOx stay visible.
esphome:
  name: twen-esp32c3-pro
  friendly_name: Twen ESP32C3 Pro Air Monitor
  on_boot:
    priority: 600
    then:
      - logger.log: "=== ESP32C3 BOOTED ==="

esp32:
  board: esp32-c3-devkitm-1
  variant: esp32c3
  framework:
    type: esp-idf

logger:
  level: DEBUG
  baud_rate: 115200

api:
  encryption:
    key: "YOUR_ENCRYPTION_KEY_HERE"

ota:
  platform: esphome
  password: "YOUR_OTA_PASSWORD_HERE"

wifi:
  ssid: "YOUR_WIFI_SSID"
  password: "YOUR_WIFI_PASSWORD"

  ap:
    ssid: "ESP32C3-Pro Fallback"
    password: "password123"

captive_portal:

web_server:
  port: 80

# ----------------- I2C Bus -----------------
# Crucial: GPIO 5 and 6 for this specific board!
i2c:
  id: bus_a
  sda: GPIO5
  scl: GPIO6
  scan: true
  frequency: 100kHz

# ----------------- Fonts -----------------
font:
  - file: "gfonts://Roboto"
    id: font_small
    size: 12

# ----------------- Sensors -----------------
sensor:
  - platform: wifi_signal
    id: wifi_rssi
    name: "WiFi Signal"
    update_interval: 60s

  - platform: sen5x
    i2c_id: bus_a
    address: 0x69
    update_interval: 10s
    # PM Sensors
    pm_1_0:
      id: sen55_pm10
      name: "SEN55 PM1.0"
    pm_2_5:
      id: sen55_pm25
      name: "SEN55 PM2.5"
    pm_4_0:
      id: sen55_pm40
      name: "SEN55 PM4.0"
    pm_10_0:
      id: sen55_pm100
      name: "SEN55 PM10"
    # Climate
    temperature:
      id: sen55_temp
      name: "SEN55 Temperature"
    humidity:
      id: sen55_hum
      name: "SEN55 Humidity"
    # Gas Indices
    voc:
      id: sen55_voc
      name: "SEN55 VOC Index"
    nox:
      id: sen55_nox
      name: "SEN55 NOx Index"

# ----------------- Display Logic -----------------
display:
  - platform: ssd1306_i2c
    id: oled
    i2c_id: bus_a
    model: "SSD1306 128x64"
    address: 0x3C
    rotation: 0
    flip_y: False
    lambda: |-
      it.fill(Color::BLACK);

      // --- Line 1: Auto-Carousel for PM values ---
      static uint32_t last_switch = 0;
      static int page = 0;
      uint32_t now = millis();

      // Switch page every 5000ms (5 seconds)
      if (now - last_switch > 5000) {
        page = (page + 1) % 4; // Cycles 0 -> 1 -> 2 -> 3
        last_switch = now;
      }

      // Check if sensors have data before printing
      if (id(sen55_pm10).has_state()) {
        if (page == 0) {
          it.printf(0, 0, id(font_small), "PM1.0 : %.1f ug/m3", id(sen55_pm10).state);
        } else if (page == 1) {
          it.printf(0, 0, id(font_small), "PM2.5 : %.1f ug/m3", id(sen55_pm25).state);
        } else if (page == 2) {
          it.printf(0, 0, id(font_small), "PM4.0 : %.1f ug/m3", id(sen55_pm40).state);
        } else {
          it.printf(0, 0, id(font_small), "PM10  : %.1f ug/m3", id(sen55_pm100).state);
        }
      } else {
        it.printf(0, 0, id(font_small), "PM: --");
      }

      // --- Line 2: Temp + Humidity ---
      if (id(sen55_temp).has_state() && id(sen55_hum).has_state()) {
        it.printf(0, 16, id(font_small), "T: %.1f C  RH: %.1f%%",
                  id(sen55_temp).state, id(sen55_hum).state);
      } else {
        it.printf(0, 16, id(font_small), "T/RH: --");
      }

      // --- Line 3: VOC Index ---
      if (id(sen55_voc).has_state()) {
        it.printf(0, 32, id(font_small), "VOC idx: %.0f", id(sen55_voc).state);
      } else {
        it.printf(0, 32, id(font_small), "VOC idx: --");
      }

      // --- Line 4: NOx Index ---
      if (id(sen55_nox).has_state()) {
        it.printf(0, 48, id(font_small), "NOx idx: %.0f", id(sen55_nox).state);
      } else {
        it.printf(0, 48, id(font_small), "NOx idx: --");
      }
5. How it Performs
On boot, the I2C scan should detect 0x3C for the OLED and 0x69 for the SEN55.
The Sensor Behavior:
-
Auto-Cleaning: The SEN55 runs a fan cleaning cycle every 7 days (604,800s).
-
Warm-up: For the first ~10 seconds after power-on, the NOx index might output
0xFFFF(invalid). This is documented behavior; just give it a moment. -
Sensitivity: The VOC index reacts quickly to everyday changes. Cooking, opening a window, or changing airflow can produce visible jumps.
The display layout is intentionally simple. Temperature, humidity, VOC, and NOx stay in fixed positions, while PM1.0, PM2.5, PM4.0, and PM10 rotate through the top line. That keeps the tiny 128×64 screen useful without turning it into a wall of numbers.
6. Home Assistant Integration
Because the ESPHome api: block is enabled, Home Assistant can discover the device and add all the exposed sensors.
- Open Home Assistant.
- It should auto-discover “Twen ESP32C3 Pro”.
- Click Configure and enter the encryption key.
After that, the more interesting work happens in dashboards and automations: plotting PM and VOC trends, comparing rooms, and checking whether ventilation changes actually show up in the data.
7. Conclusion
This build hit the target I cared about: a cheap, inspectable monitor that reports the air-quality signals I wanted and feeds them into Home Assistant.
What worked well:
- Cost: about $30 total, with the SEN55 taking almost the whole budget.
- Build complexity: no soldering was required because the adapter cable matched the sensor and dev board.
- Software: ESPHome made iteration and Home Assistant integration straightforward.
- Size: the hardware is small enough to move around the room while testing placement.
Limitations:
- Aesthetics: without a case, it is still a bare-board prototype with visible wiring.
- Power: the SEN55 fan draws enough current that this is a USB-C powered build, not a battery project.
- Measurement scope: VOC and NOx are relative indices from 0 to 500, not absolute PPB concentrations. They are useful for trends, not lab-grade analysis.
Next improvements:
- Designing and 3D printing a proper case with airflow channels.
- Adding a capacitive touch button to manually toggle screens.
- Enabling Bluetooth Proxy on the ESP32 to track other BLE devices in the room.
The main takeaway is that the hard part was not the sensor or the YAML. It was identifying the board-specific I2C wiring. Once that was correct, the rest of the stack behaved predictably.